Everything you need to get the most out of your menu bar. This is the same guide that ships inside the app.
Welcome
Barista is a Mac app that gives you a curated library of menu-bar widgets. Each widget owns one slot in the bar at the top of your screen. Click a widget's icon to open its popover; right-click for a context menu.
This guide walks through everything Barista can do. You can also reopen it any time from the Help button in the top-right of the Configure window inside the app.
Quick Start
Five things to do right now:
Enable the widgets you want from the list in the Configure window, flip each row's toggle on.
Reorder widgets by holding ⌘ and dragging them directly in the menu bar (or the Barista bar), exactly like macOS's own menu-bar items.
Click any widget's icon in the menu bar to open its popover. Right-click for a context menu (Configure, Help, About, Quit).
If the menu bar fills up, especially on a notched MacBook, click Compact all at the top of the list to shrink every widget. You can expand them individually later from each widget's settings.
Press ⌘W (or click outside) to dismiss any popover. ⌘, jumps to that widget's settings.
That's it, read on for the details, or close this and play with the dashboard. Help is always one click away.
Enabling widgets
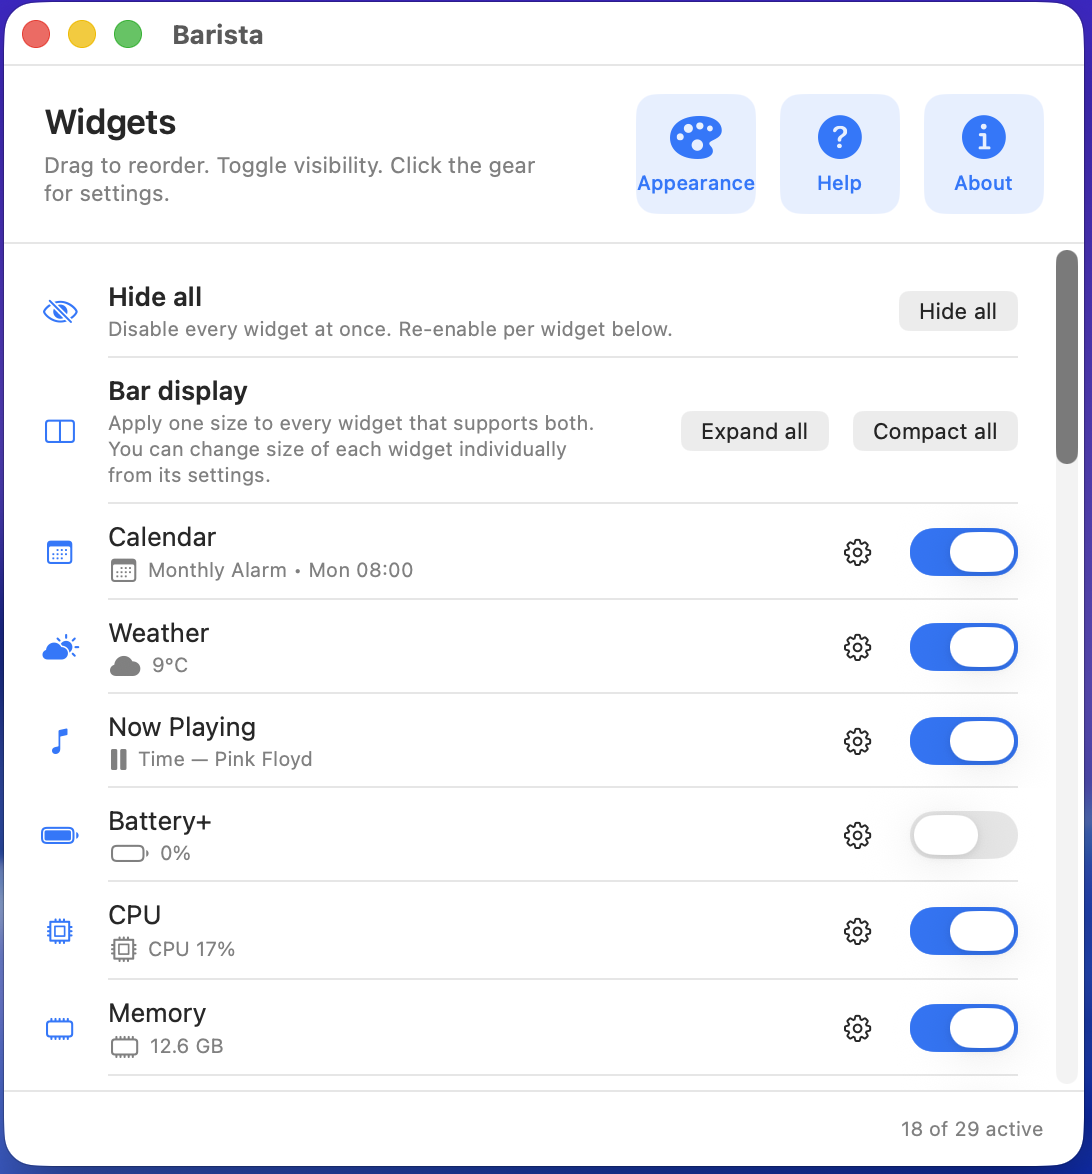
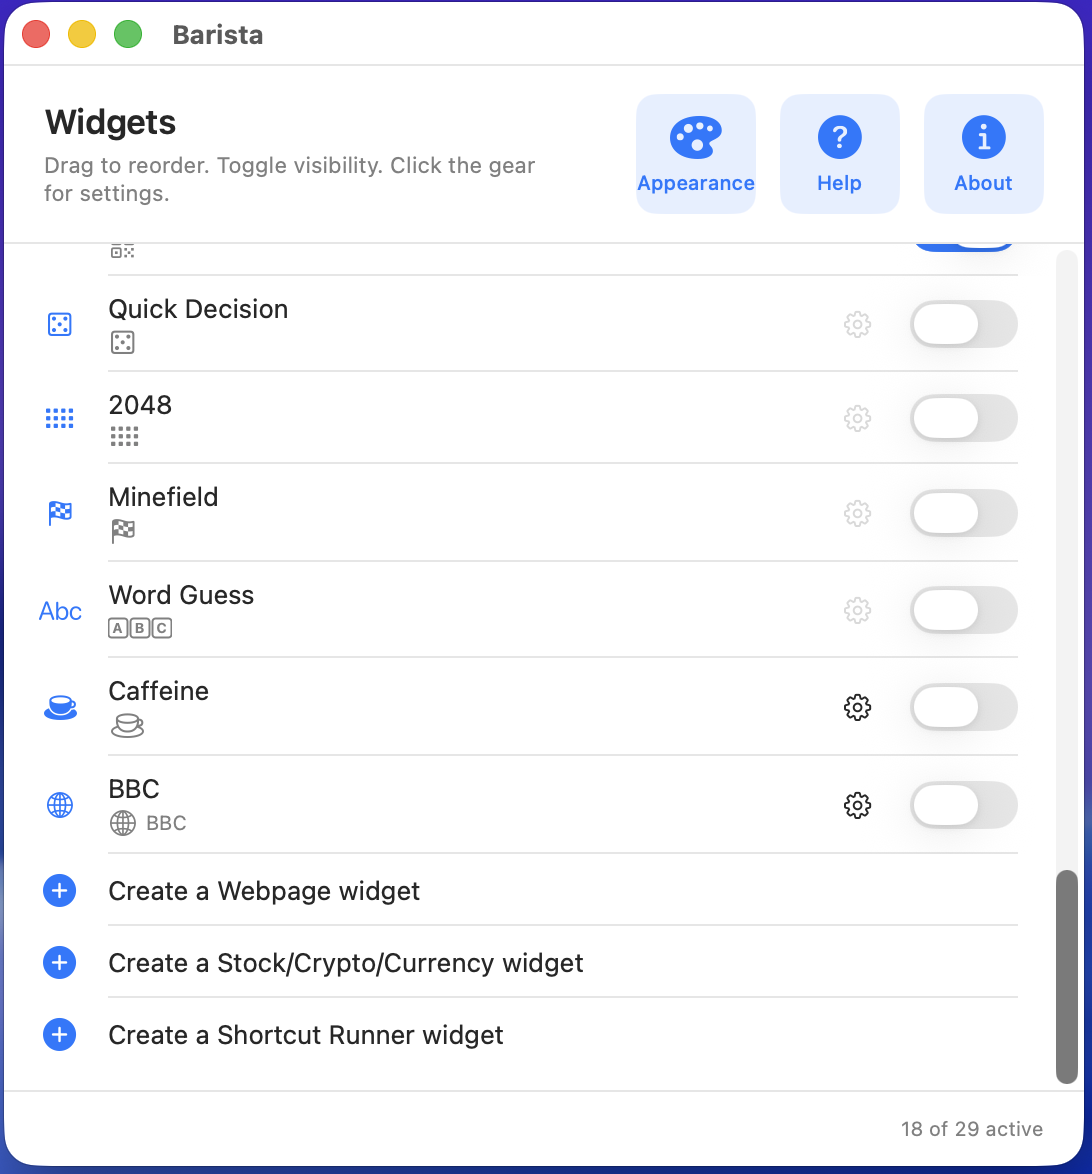
Toggle the switch on the right of any widget row to show or hide it in the menu bar.
Reorder widgets by holding ⌘ and dragging them in the menu bar (or the Barista bar), just like macOS's own status items. The settings list itself isn't drag-reordered; it's grouped by category.
Click the gear on a widget row to open its settings (refresh cadence, filters, accounts, etc.).
Use Hide all at the top to disable everything in one click. There's no "enable all", re-enable widgets one at a time so you don't accidentally crowd the bar.
Each row: gear (left of the toggle) opens the widget's settings; toggle (right) shows or hides it in the menu bar.
Bar display: Expanded vs Compact
Each widget can render in one of two sizes:
Expanded: icon + text (e.g. "BTC $69,491 +1.20%", "5d until trip"). More info per glance.
Compact: icon only, or a single number (e.g. "5" for unread reminders). Saves bar space.
Use the Expand all / Compact all buttons in the dashboard to flip every widget at once, or set each one individually from inside its settings page.
Expand all / Compact all sit on the Bar display row at the top of the dashboard, flip every multi-size widget at once.
Working with popovers
Click a widget's bar icon to open its popover.
Click anywhere outside to dismiss.
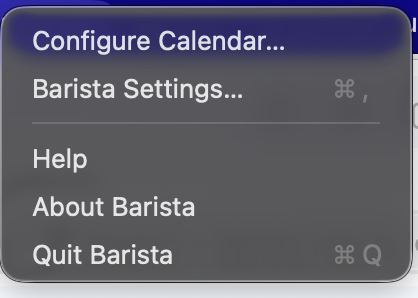
Right-click a bar icon for a context menu: Configure <widget>, Barista Settings, Help, About, Quit.
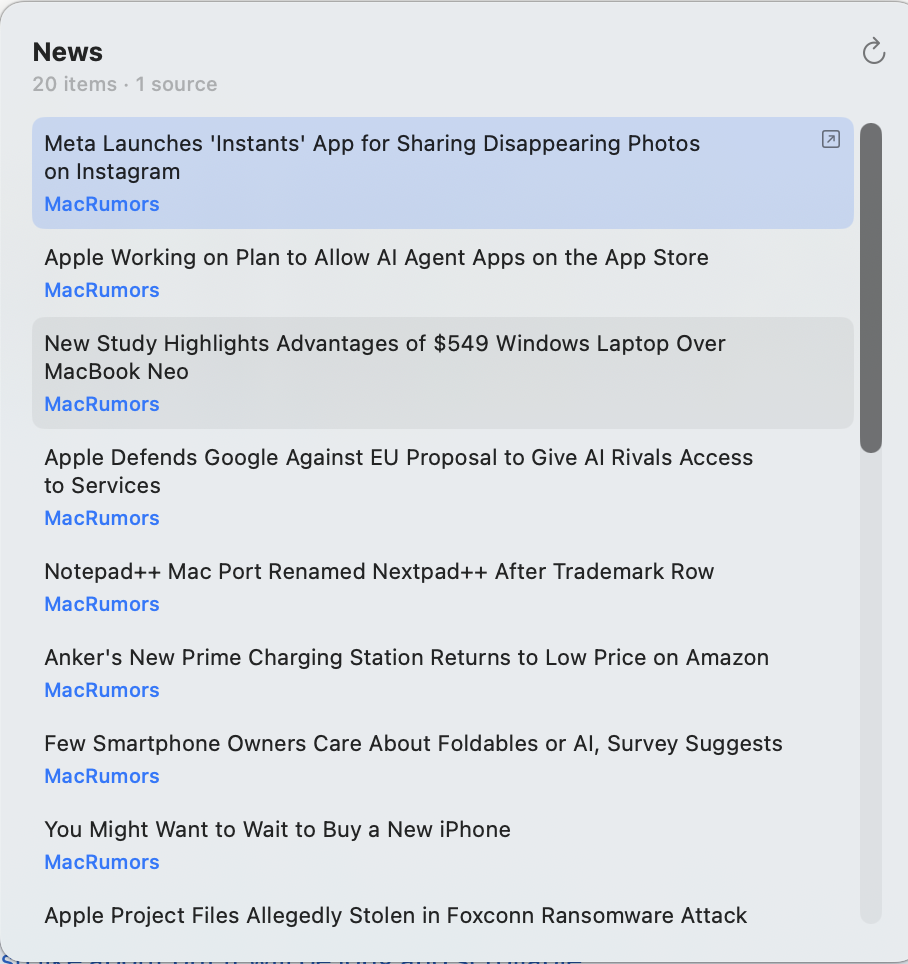
Right-click any bar widget for this context menu, the top item jumps straight to that widget's settings.Keyboard selection in the News popover, ↑/↓ move, Return opens. The selected row tints accent.
Unpin, move and reset a popover
A popover normally opens pinned under its menu-bar icon and closes when you click elsewhere. Unpin it when you want to keep it on screen while you work in other apps.
Unpin: hover over the popover and click the unpin button in its top-right corner, or press ⌘P. It becomes a floating window with a title strip and stays open when you switch apps.
Move: drag the title strip at the top of the floating window to place it anywhere on screen.
Resize: drag the grip in the bottom-right corner. A popover can grow but can't be made smaller than its default size. Weather always fits its height to its content, so for Weather only the width changes.
Close: click the red button on the left of the title strip, or press ⌘W. Esc doesn't close an unpinned popover, so a stray keypress won't dismiss it.
Remembered: Barista remembers each popover's position, size and unpinned state, so next time you open it, it comes back where you left it.
Reset: click the reset button on the right of the title strip, or press ⌘P again. The popover goes back under its menu-bar icon at its default size and closes on click-away again. Once a popover has been moved or resized, you can also right-click its menu-bar icon and choose Reset popover position.
Keyboard shortcuts
Inside a popover:
⌘WDismiss the popover.
⌘,Jump to this widget's settings page.
⌘PUnpin the popover into a floating window you can move and resize. On a popover you've already moved, it resets it under its menu-bar icon.
EscDismiss a popover that's under its menu-bar icon (unless you're typing in a field). Unpinned popovers ignore Esc; use ⌘W or the close button.
↑ ↓Navigate lists in News, Email, Reminders, Clipboard.
ReturnOpen the selected item. In Reminders that's a deep-link into Reminders.app; in News / Email it opens the article or message.
⇧ReturnIn Clipboard, copy the selected item as plain text (any formatting stripped).
SpaceIn Reminders, marks the selected reminder complete (with an Undo banner). In other list widgets, same behaviour as Return.
⌘ZUndo the last reminder completion while the banner is still visible.
Global, these work from anywhere, even with no popover open. These are the defaults; change them in Settings → Shortcuts:
⌥⌘BOpen or close the Barista bar from anywhere, even when the menu bar is completely full.
⌥⌘SOpen Search from anywhere, Spotlight-style. Requires the Search widget to be enabled (it anchors to Search's menu-bar item); if Search is turned off, this shortcut does nothing.
⌘⇧VOpen the Clipboard picker from anywhere, Spotlight-style. Pick an item, then press ⌘V in the app you were using. Requires the Clipboard widget to be enabled.
⌥⌘KOpen the command palette to jump to any widget by name, even one that isn't in your menu bar yet.
Customising keyboard shortcuts
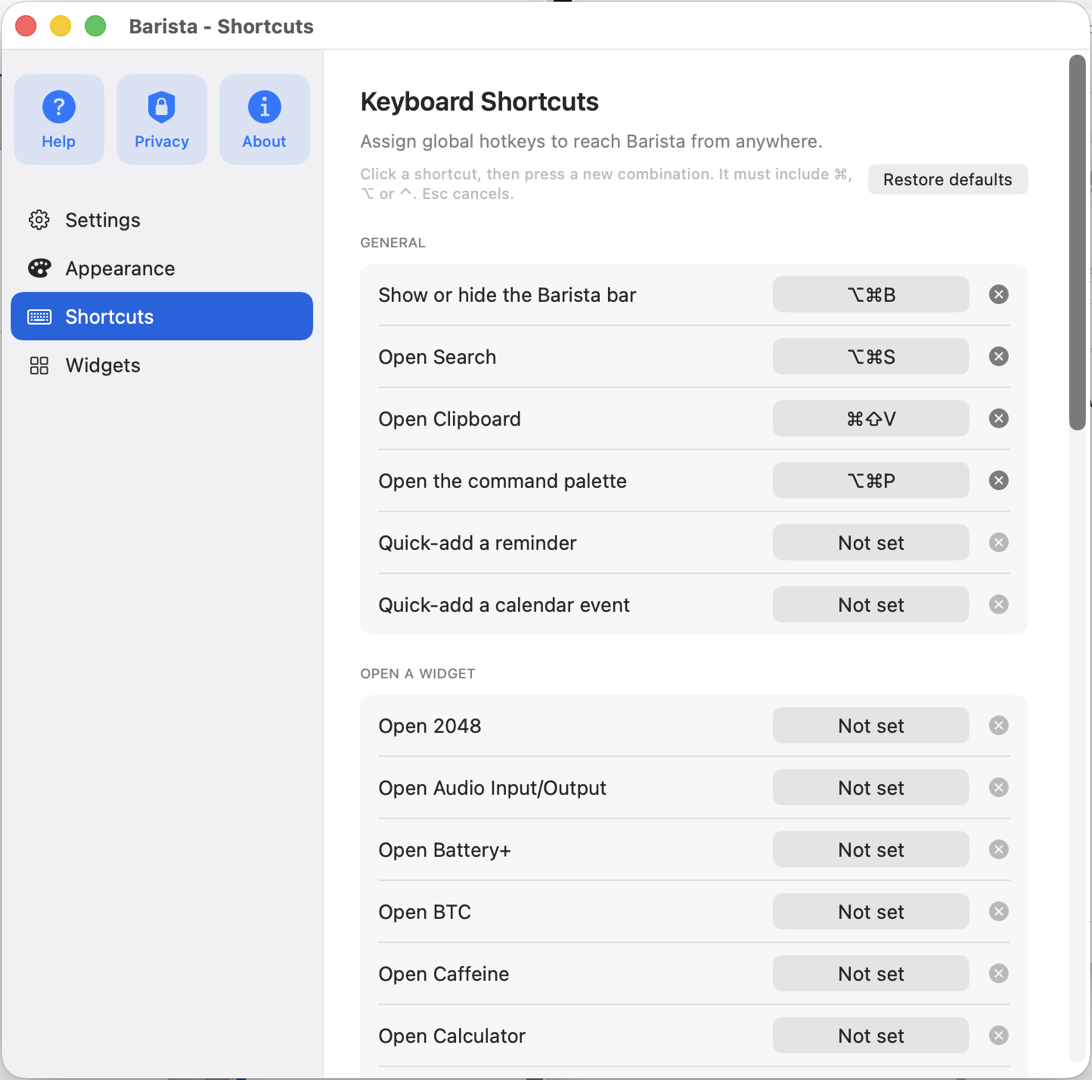
Open Barista Settings and choose Shortcuts in the sidebar to set global hotkeys. They work from any app, and changes apply immediately.
General: the Barista bar, Search, Clipboard and the command palette come with default shortcuts. Quick-adding a reminder or a calendar event has no shortcut until you set one.
Open a widget: give any widget its own shortcut that opens its popover directly.
Record: click a shortcut, then press the new combination. It must include ⌘, ⌥ or ⌃. Press Esc or click anywhere else to cancel.
Clear: click the ✕ button next to a shortcut to remove it, including a built-in one. It stays off until you record a new combination.
Conflicts: when two actions share a combination, both show Used by another shortcut. Change one of them, since only one can fire reliably.
Restore defaults: the button at the top of the pane puts every action back to its built-in shortcut. Barista asks you to confirm first, because this removes all your changes, including shortcuts you cleared.
Settings, Shortcuts: click a shortcut to record a new combination, clear one with its ✕ button, or put them all back with Restore defaults.
Appearance: theme and tints
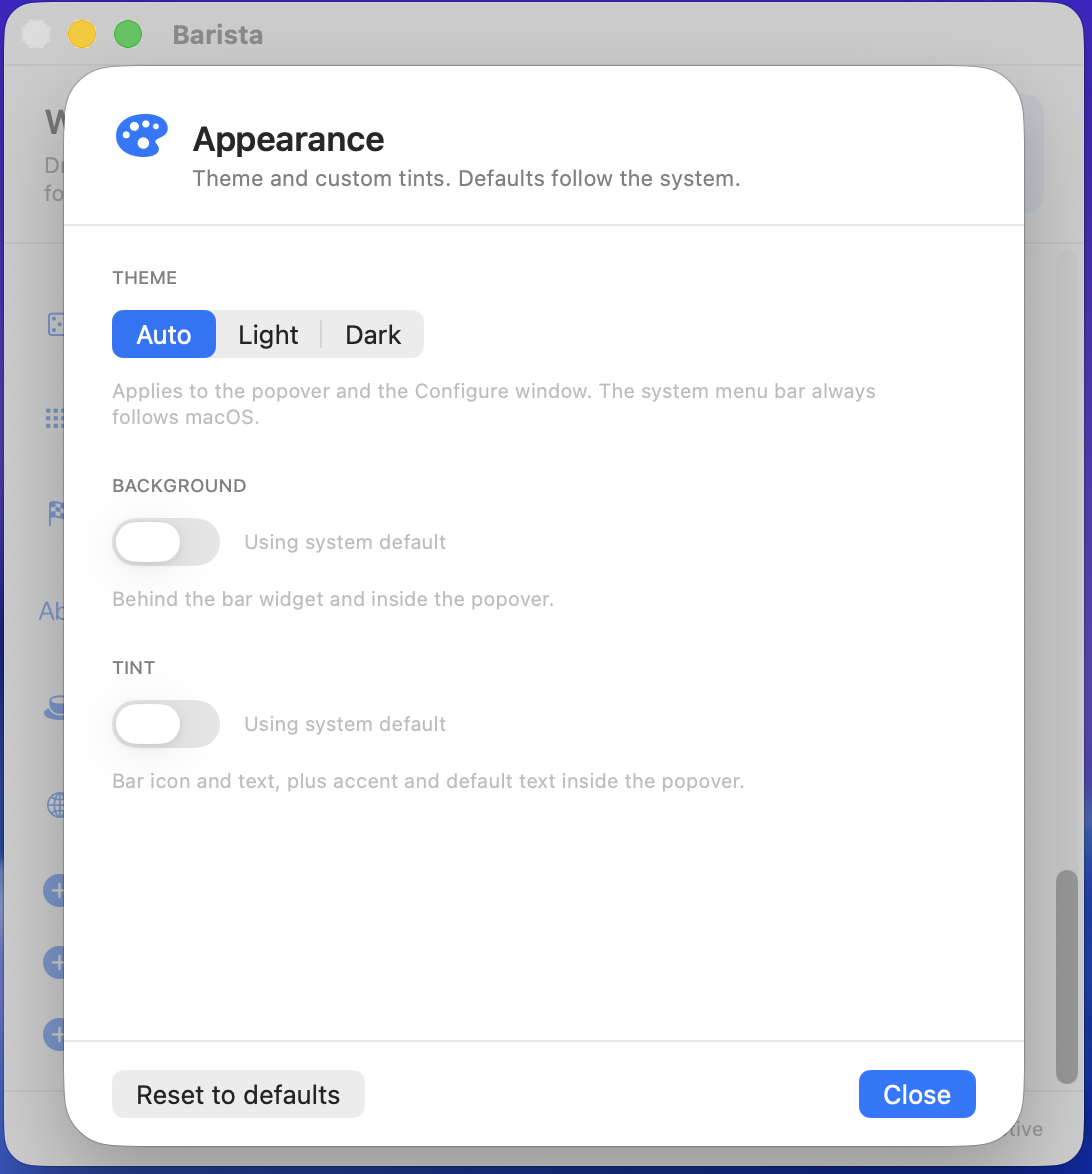
The Appearance button in the dashboard top-right opens a panel with three knobs. Defaults follow the system; flip a toggle on to override.
Theme: Auto, Light, or Dark. Applies to the popover and the Configure window. The system menu bar always follows macOS itself, so a Light app theme over a Dark menu bar is fine.
Background: colour painted behind the bar widget icon and inside the popover. Off by default; pick a colour and a translucent overlay rides on top of the system material so the frosting still reads through.
Tint: colour for bar icons and text, plus the popover's accent. Off by default (uses the system accent). Turning it on recolours every "accent" surface in the popover at once, selection highlights, source labels, pill buttons.
Each toggle has a Reset to defaults path via the button at the bottom-left of the panel. Settings persist across launches.
Appearance panel, three independent toggles, each defaulting to "follow the system".
The Barista bar
The Barista bar is a second, app-owned menu bar that drops down on demand and holds your widgets, so you're never at the mercy of how much room macOS leaves in the system menu bar.
Collapse into one item: turn this on (dashboard, or right-click any widget → "Collapse into one item") and every widget folds behind a single Barista cup icon. Click that icon to drop the Barista bar down with all your widgets live inside it. It's a per-display switch, so you can collapse on the laptop and stay expanded on an external monitor.
Live, not static: each item in the bar shows the same icon and updating text as the real menu bar (ticker scrolling, prices moving). Click one to open that widget's full popover; hover for the highlight, exactly like a status item.
Always open, move it anywhere: the bar stays put until you close it, it never disappears when you click elsewhere. Drag it wherever suits you on screen.
Reset position: moved it somewhere awkward? Reset Barista bar position in the dashboard returns it to the default slot under the top-right of the menu bar.
Show or hide it: toggle the bar with ⌥⌘B, by clicking the collapsed Barista cup icon, or with the Barista Bar is visible switch in the dashboard (just under Launch at login). To hide it, right-click the bar and choose Close Barista bar. Your choice is saved per display and remembered across launches; on a notched MacBook the bar is on by default.
Press ⌥⌘B any time to open or close the Barista bar, even when the system menu bar is completely full and every icon (including the collapsed one) is hidden behind the notch. It never depends on menu-bar space, so it's the guaranteed way in.
Adding more than one of something
Some widgets spawn one bar item per definition you add. Each appears in its own category with a + row instead of an on/off switch; click the + to add another. Webpage and Stock / Crypto / Currency sit under Information, Shortcut Runner under System, and Event Countdown under Productivity.
Webpage: pin any URL with its favicon. Click the bar item for an inline browser view of the page.
Stock / Crypto / Currency: track each ticker as its own bar widget. Chart with 24h / 7d / 1m range picker in the popover.
Shortcuts Runner: bind any macOS Shortcut to a bar icon. Click → Run → captured output in the popover.
Event Countdown: add as many countdowns as you like (a birthday, a trip, a deadline); each is its own bar widget with a name, date and icon.
Meta-widgets live in their own category with a + row instead of an on/off switch. Each + spawns a new dedicated bar widget per definition.
Launch at login
Barista can start automatically when you log in, so your widgets are there from the moment your desktop appears.
In Barista: toggle Launch at login in the dashboard. Barista also turns this on once, automatically, after your first launch; flip it off any time and that choice is respected from then on.
In macOS: the same setting appears under System Settings → General → Login Items. Changing it there and changing it in Barista stay in sync.
Barista uses Apple's modern, sandbox-safe login-item API, no helper login agent, no extra background process.
Email setup
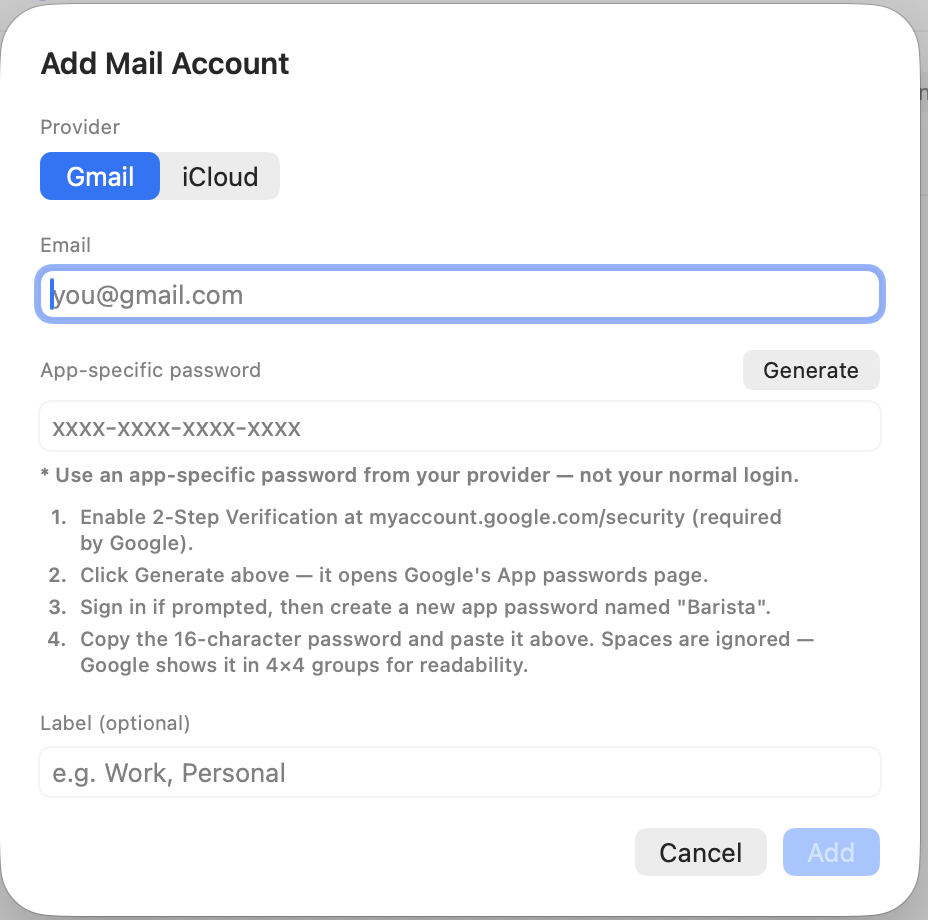
The Email widget speaks IMAP+SMTP directly, no third-party server. You'll need an app-specific password from your provider (not your account password).
iCloud: appleid.apple.com → Sign-In and Security → App-Specific Passwords.
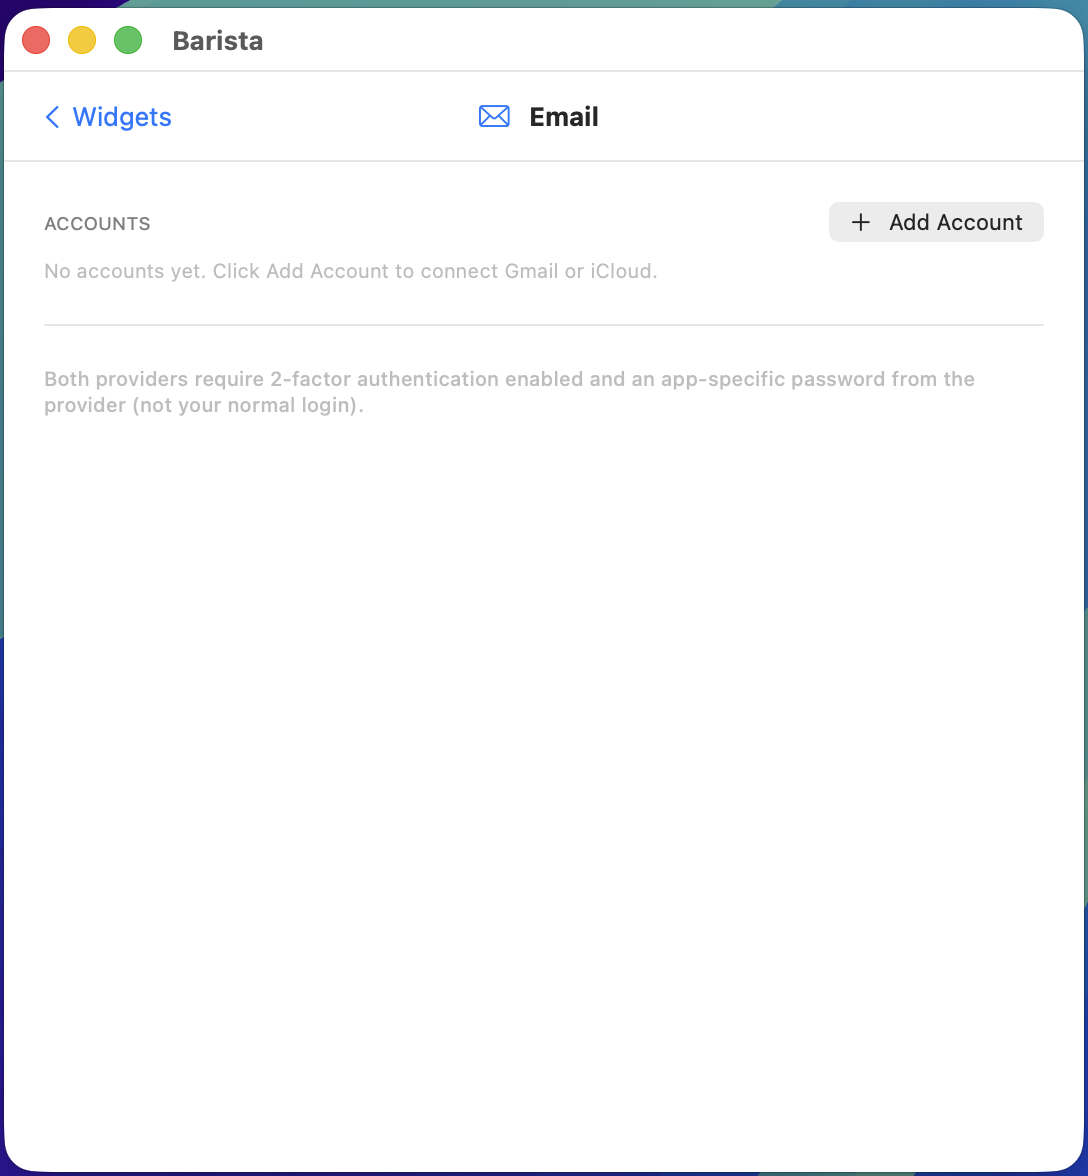
The Email widget settings, click + Add Account to connect Gmail or iCloud.Pick the provider, enter your address, and paste the app-specific password. The sheet walks you through generating one for Gmail.
Once added, Reply / Reply All / Forward / Mark Unread happen inside the widget, no handoff to another mail client.
Permissions
Widgets only ask for what they need, and only the first time you enable a widget that needs one, there's no up-front wall of prompts:
Calendar: to show and manage your events (view, create, edit).
Reminders: to show and edit your reminders.
Contacts: recipient suggestions as you compose in the Email widget. Read-only, matched on your Mac.
Automation (Spotify, Music, Shortcuts): for Now Playing, and to list and run your Shortcuts.
Location: local-weather auto-detect (Weather) and the Wi-Fi network name (Network).
Notifications: timer alerts (Focus / Interval Timer) and the Battery low-charge alert.
If you decline a prompt, the widget shows a friendly fallback. You can change grants any time in System Settings → Privacy & Security (and Notifications).
Health & Diagnostics
When something needs attention, an orange Health banner appears at the top of Settings. It groups three kinds of issue so nothing fails silently:
Turned off after a crash: if a widget took the app down, Barista disables just that one on the next launch so it can't crash-loop the whole bar. Re-enable to try again, or Dismiss to leave it off.
Missing a permission: an enabled widget whose system access was denied (Calendar, Reminders, Location, Automation). One click opens the exact System Settings pane; the banner clears itself once you grant it.
Not getting data: an enabled widget whose source has been failing (offline, rate-limited, or down). It keeps retrying on its own; open the widget for the detail and a Retry.
Diagnostics (Settings → Diagnostics) shows a short, non-personal summary: app version and build, macOS version, your Mac model and processor, which widgets are enabled, and any quarantined ones, with a Copy button. The same details are pre-filled into the Contact Support email (About → Contact Support) with a space for your message. Barista ships no analytics or telemetry; this is the user-shareable substitute.
Notched displays & menu-bar space
On a 14"/16" MacBook Pro or notched MacBook Air the menu bar beside the camera is narrow and shared with every other menu-bar app. macOS hides whatever doesn't fit, so Barista's widgets can be pushed off even though they show fine on an external display. Barista has four layers of defence:
Per-display layouts: each screen remembers its own set of enabled widgets, order and options, keyed to the display. Plug into an external monitor and you get the full layout; unplug and the laptop's trimmed layout comes back automatically. Set each one up while that display is active, the widget list header shows which display you're editing.
Auto-compact: on a notched screen every widget is automatically shrunk to icon-only (about four fit in the space of one expanded widget), and restored to your chosen size on a roomy external display.
Collapse into one item: a per-display switch (in the dashboard, or right-click any widget → "Collapse into one item"). Replaces every widget with a single Barista cup icon; click it for a drop-down bar of all your widgets. One icon is far harder for macOS to push off than ten. That drop-down bar can be dragged anywhere and stays open until you close it.
Global hotkey (⌥⌘B): press it any time to open Barista's bar, anchored under the menu bar. This works even when the menu bar is completely full and every icon (including the collapsed one) is hidden; it never depends on menu-bar space, so it's the guaranteed way in.
You can also free space by hiding system items in System Settings → Control Centre, or by disabling widgets you don't actively use.
Troubleshooting & FAQ
Barista's icons aren't in the menu bar (notched Mac)? The bar is probably full of other apps. Press ⌥⌘B to open Barista anyway, then turn on "Collapse into one item" and/or quit some other menu-bar apps. See "Notched displays" above.
Do my settings carry between displays? Each display has its own layout (enabled widgets, order, collapse setting). They're saved per display and switch automatically when you connect or disconnect a monitor.
Can widgets show on both screens at once? The widgets are only active on the display that currently owns the menu bar (the focused one), where Barista applies that display's layout. With "Displays have separate Spaces" on, macOS may also draw the icons on your other display's menu bar, but only the active display's set is live.
What does ⌥⌘B do? Opens or closes Barista's widget bar from anywhere, even with a completely full menu bar. The bar stays open until you close it (⌥⌘B again, right-click → Close Barista bar, or the "Barista Bar is visible" switch in the dashboard); drag it where you like.
Widget not appearing after enabling? Quit Barista (right-click any widget → Quit, or ⌥⌘B → gear → Quit) and relaunch; Sequoia occasionally caches stale visibility state.
Permission denied? Reset it: System Settings → Privacy & Security → find the section → toggle Barista off and back on.
Mail send fails? Re-check the app-specific password; some providers expire them after long inactivity.
Deleting all Barista data
Barista keeps your settings, clipboard history, scratchpad notes and email passwords on your Mac, inside its sandbox container and the keychain. To remove everything cleanly, reset before you delete the app.
Recommended: reset first. In Settings, use Reset to factory settings. It erases your saved mail passwords and the per-app encryption keys from the keychain, all on-disk data (clipboard history, scratchpad, mail cache, battery history) and every preference, then relaunches into a clean state. Do this before deleting the app; the keychain secrets are awkward to remove by hand afterwards.
Then remove the app. Quit Barista and drag it from your Applications folder to the Trash.
Skipped the reset, or already deleted the app? Remove the leftovers by hand. In Finder choose Go → Go to Folder… and delete ~/Library/Containers/com.mastorakis.barista (this folder holds all settings and data). Then open Keychain Access, search for mastorakis, and delete any Barista items.
Permissions (optional). Revoke Barista's access under System Settings → Privacy & Security (Calendar, Reminders, Contacts, Location, Automation).
iCloud sync. If you turned on iCloud settings sync, a copy of your settings also lives in iCloud and syncs to your other Macs. Reset on each Mac, or turn sync off, to clear that copy too.
Contact support
Still stuck? Email support@mastorakis.com with a description of what's happening, your macOS version, your Mac model, the affected widget and if possible a screenshot showing the problem. We read every message.
For details on what data Barista handles (short answer: nothing leaves your Mac), see the Privacy Policy.